
A clearing is a payout of accumulated funds to the merchant's bank account. A merchant can only receive a clearing after all documents have been approved and the internal audit has been successfully completed.
Time of clearing
- The clearing process starts on working days at 10:00 and is completed by 14:00 at the latest.
- Payments are submitted to your bank the same day.
- You will receive an email, if you have enabled financial notifications , as soon as we have sent the payment.
- In most cases, the payment will appear in your account on the same business day.
If you have not received the payment within 2 working days after receiving the confirmation email, please contact us.
We invoice the rates you pay for our services on a weekly or monthly basis.
1. Book balance
The book balance is the total of payments with the status PAID that have not yet been paid out to you, minus outgoing payments such as refunds, chargebacks, and reversals.
View book balance

Your book balance is listed on the 'Financial Overview' page. To view your current book balance, follow these steps.
- In the Admin Panel, go to the Merchant tab » Invoices (Clearing) https://admin.pay.nl/balance
- Under 'Status', you will see the field Book Balance Image: Viewing Book Balance followed by your balance in euros.
Increase book balance
Increase book balance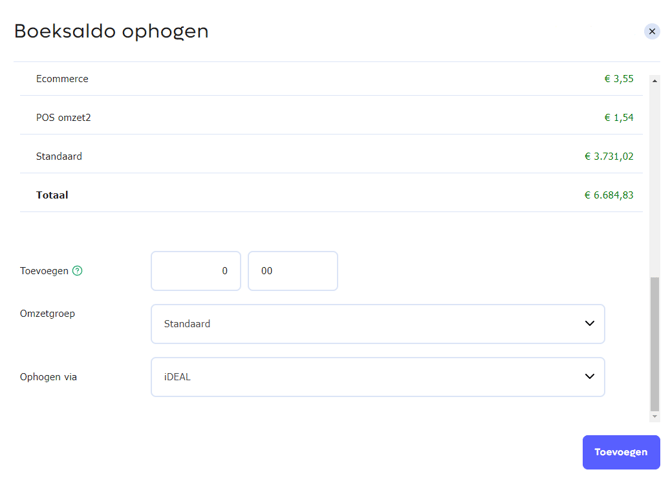
In some cases, it may be necessary to top up your balance. For example, if you wish to issue a refund but your balance is too low, it is not advisable to wait until your balance is sufficient again. You can then top up your balance by the desired amount using iDEAL, bank transfer, or Bancontact payment.
Please note: With a payment via iDEAL or Bancontact, your book balance will be topped up immediately. If you choose bank transfer, this may take 1 to several business days, depending on your bank's processing speed.
To increase your book balance, follow these steps.
-
In the Admin Panel, go to the Merchant tab » Invoices (Clearing) https://admin.pay.nl/balance .
-
Under 'Status', you see the field Book Balance Image: View book balance followed by the link 'Deposit'
-
Click on the 'Deposit' link. A new page will now be displayed. Image: Increasing book balance
-
Enter the amount in euros you want to increase in the Amount field .
-
Under Payment method, select the desired payment method you want to use to top up the amount.
-
Click the 'Add' button at the bottom of the screen to start the payment and top up your book balance.
2. Book balance (Revenue groups)
View book balance per revenue group%201.png?width=637&height=125&name=Boeksaldo%20(Omzetgroepen)%201.png)
View book balance per revenue group.%202.png?width=670&height=475&name=Boeksaldo%20(Omzetgroepen)%202.png)
Increase book balance per revenue group.%203.png?width=670&height=469&name=Boeksaldo%20(Omzetgroepen)%203.png)
Internal debit and credit entry Revenue Group.
Payment per revenue group.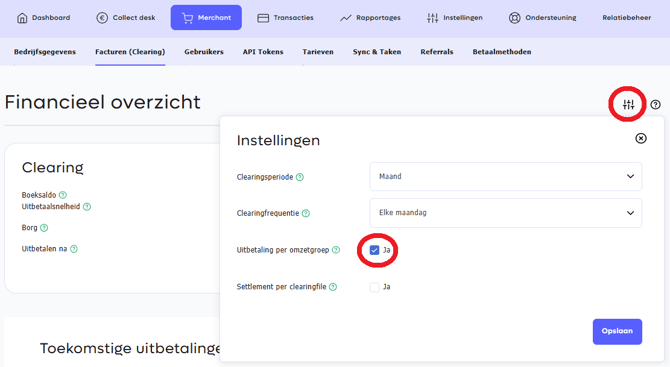
Add payout description.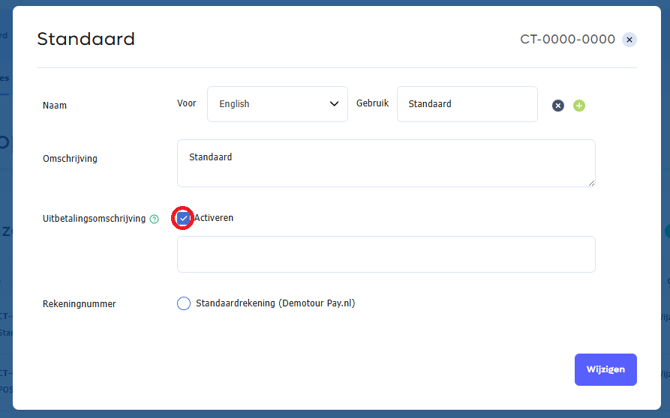
The book balance of a revenue group is the total of successful transactions within the revenue group with the status PAID that have not yet been paid out to you, minus outgoing payments such as refunds, chargebacks, and reversals. Any PAY. costs may also be settled per revenue group. Your book balance can only be paid out if the balance of all individual revenue groups is positive.
Internal settlement of package costs
If you have multiple revenue groups within your merchant account, you must mark one revenue group as Default . Costs that cannot be allocated to a sales location, such as recurring package costs, will then be settled against the selected revenue group.
If one of the revenue groups has a negative balance, you will see the message:
Revenue group with negative balance . As a result, the clearing will not be paid out.
What causes a negative balance?
The most common cause is when package costs are charged to a revenue group that generates no revenue. Therefore, if you use revenue groups, you must mark one revenue group as Default . If a revenue group is marked as default but generates no revenue, the balance will become negative. To change the Default revenue group , go to https://admin.pay.nl/programs/programs and click on Mark as default next to the revenue group with which you want to charge these costs.
How do you resolve the negative balance of a revenue group?
If you see the message "Revenue group with negative balance" , your payout is delayed, or you simply want to know the balance of your revenue groups, click on Deposit . In the pop-up, you will see the current status of each revenue group. If the balance of one of the revenue groups is negative, it will be displayed in red. You can resolve the negative balance in the following ways:
-
To top up book balance by making a deposit: Select the Revenue Group you wish to top up. Under Payment Method , choose one of the payment options below. Click Add to start the transaction.
-
Payment via iDEAL: The book balance is topped up immediately.
-
Payment via Bancontact: The book balance has been topped up immediately.
-
Payment via Bank Transfer: The book balance is topped up once your payment has been received.
-
-
Offsetting the book balance against a positive revenue group: Select the Revenue Group you wish to top up. Under Payment Method , select one of the revenue groups with a positive balance. Click Add to neutralize the negative balance. This offsetting takes place immediately. We will pay out according to the next payment schedule (daily, weekly, or the first day of the month).
How is the settlement of balances between revenue groups processed accounting-wise?
If you have chosen to pay the negative balance of a revenue group from a revenue group with a positive balance, PAY. adds two statistics lines for this:
- An internal transfer to revenue group for the revenue group used for payment.
- An internal revenue group entry for the revenue group for which the negative credit has been replenished.
You can find more information about activating and adding revenue groups here .
Within the Pay. portal, it is possible to have payments processed per revenue group. Payments are then grouped to generate as few credits to your bank account as possible. If you wish to receive batch payments per revenue group, even though the payout account is the same, activate the following option ( see image 'Payment per revenue group' ). Invoices will then also be settled separately. It may occur that you have a positive balance on one revenue group and a negative balance on the other.
With the Payout per revenue group option activated, it is also possible to add an extra Payout description that is displayed on the bank statement upon payment. This can be free text for up to 40 tokens. The free text can be edited within the portal under: Settings -> Sales locations -> Revenue groups -> Edit. Activate the option and enter the desired text ( see image: Add payout description ).
3. Reconciliation
As soon as payments via the payment methods Klarna, Riverty, in3, and Billink have been successfully processed, the system waits for receipt of funds from the payment option (supplier) before releasing the clearing/payout.
In most cases, this is a smooth process that runs continuously. Occasionally, however, a payment option pays us out earlier or later, or they submit payments that cannot be easily processed by us. We call this an impure clearing. From that moment on, your payment may arrive later than expected. PAY. employees need time to verify the payment and confirm that everything has been paid.
If a payment option pays us but there are discrepancies in the payout files, we check the payments manually. This may delay the payout speed.
-
PAY. has processed a payment for you; the payment option indicates the forwarding status.
-
The payment will be added to your book balance. The payment does not need to have been received by this time.
-
PAY. indicates an expected release date. At this moment, the funds are being released and the amount can be transferred to your account (clearing).
-
Once funds have been released, a clearing round is awaited. You can set this via the Clearing Frequency .
-
If the payment is received earlier, the 'release date is brought forward'. We only do this if all payments for a payment option have been received on that day.
-
If the payment is received late, we will contact the payment method to investigate why we have not received the funds.
-
If the payment option has not paid out a single payment, we may choose to make a lump-sum payment to you in order to maintain insight into your cash flow.
-
If the payment option is not processed, we may 'rollback' the payment. This means that we will deduct the amount already paid from your book balance.
Starting with the business package, you can view the release time and clearing status per transaction.
4. Payout speed
Release with regular payment options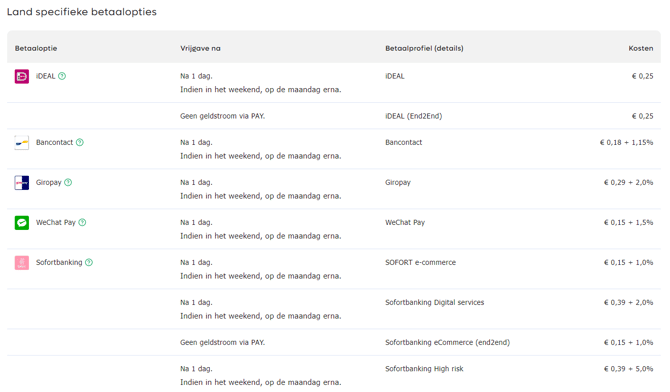
Release for pay-later options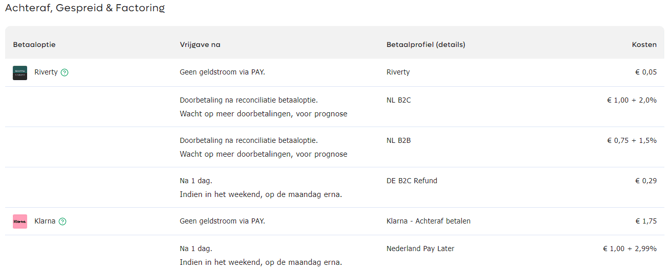
The payout speed or release period depends on your relationship with PAY. The speed is automatically increased as soon as you have been known in our system longer or receive more payments. PAY. distinguishes the following categories:
-
New merchants: New merchants automatically qualify for this payout speed for the first 100 transactions. If no cases of fraud or disputes have occurred, your connection will be automatically converted to 'In control'. If you can demonstrate a good reputation, for example through external reviews and/or a webshop quality mark, a sales representative can immediately upgrade you to 'In control'.
-
In control merchants are merchants without significant complaints or cases of fraud. Most merchants using PAY. will belong to this group. Merchants with a Professional or Business package have the option to upgrade to 'Trusted' or 'Key exclusive'.
-
Trusted merchants Trusted merchants have a long customer relationship with PAY. The merchant's reputation is good, and furthermore, there are hardly any complaints or cases of fraud, and they have at least the Professional package .
-
Key exclusive merchants Key exclusive merchants receive the fastest possible payout. Contact your account manager for the options. Available from the Business package.
You can find payout speeds under Merchant » Rates. As soon as there is enough information, the estimated payout speed for pay later is displayed.
Overview of payment options
Each payment method has its own payout speed. Below you will find the delays per payment method, taking into account the 4 categories above.
| New merchants | In control merchants | Trusted merchants | Key exclusive merchants | |
|---|---|---|---|---|
| Bancontact | + 7 day(s) | + 2 day(s) | + 1 day(s) | + 1 day(s) |
| Billink | In accordance with your agreement with Billink | |||
| Cinema voucher | + 21 day(s) | + 21 day(s) | + 14 day(s) | + 7 day(s) |
| Carte Bleue | + 14 day(s) | + 14 day(s) | + 5 day(s) | + 5 day(s) |
| CreditClick | + 7 day(s) | + 7 day(s) | + 2 day(s) | + 2 day(s) |
| Fashioncheque | + 21 day(s) | + 1 day(s) | + 1 day(s) | + 1 day(s) |
| Fashion Giftcard | + 21 day(s) | + 21 day(s) | + 14 day(s) | + 7 day(s) |
| Health voucher | + 21 day(s) | + 1 day(s) | + 1 day(s) | + 1 day(s) |
| iDEAL | + 7 day(s) | + 1 day(s) | + 1 day(s) | + 1 day(s) |
| in3 | In accordance with your agreement with in3 | |||
| Debt collection | +29 day(s) | + 14 day(s) | + 10 day(s) | + 8 day(s) |
| Klarna | In accordance with your agreement with Klarna | |||
| Maestro | + 14 day(s) | + 14 day(s) | + 5 day(s) | + 5 day(s) |
| MasterCard | + 14 day(s) | + 14 day(s) | + 5 day(s) | + 1 day(s) |
| Multibanco | + 7 day(s) | + 1 day(s) | + 1 day(s) | + 1 day(s) |
| Bank transfer | + 7 day(s) | + 1 day(s) | + 1 day(s) | + 1 day(s) |
| Paysafecard | + 21 day(s) | + 15 day(s) | + 15 day(s) | + 1 day(s) |
| Podium Gift Card | + 21 day(s) | + 14 day(s) | + 1 day(s) | + 1 day(s) |
| Postepay | + 14 day(s) | + 14 day(s) | + 5 day(s) | + 5 day(s) |
| Riverty | In accordance with your agreement with Riverty | |||
| Instant banking | + 7 day(s) | + 2 day(s) | + 1 day(s) | + 1 day(s) |
| Spraypay | + 30 day(s) | + 25 day(s) | + 21 day(s) | + 14 day(s) |
| VISA | + 14 day(s) | + 14 day(s) | + 5 day(s) | + 5 day(s) |
| Yourgift Card | + 21 day(s) | + 1 day(s) | + 1 day(s) | + 1 day(s) |
| Webshop Gift Card | + 21 day(s) | + 5 day(s) | + 5 day(s) | + 1 day(s) |
| PayPal Gateway | Payment is not processed via PAY. | |||
Overview of in-store (card) payment options
| New merchants | In control merchants | Trusted merchants | Key exclusive merchants | |
|---|---|---|---|---|
| Maestro | + 14 day(s) | + 1 day(s) | + 1 day(s) | + 1 day(s) |
| V-PAY | + 14 day(s) | + 1 day(s) | + 1 day(s) | + 1 day(s) |
| MasterCard Debit | + 14 day(s) | + 1 day(s) | + 1 day(s) | + 1 day(s) |
| VISA Debit | + 14 day(s) | + 1 day(s) | + 1 day(s) | + 1 day(s) |
| MasterCard | + 14 day(s) | + 7 day(s) | + 5 day(s) | + 3 day(s) |
| VISA | + 14 day(s) | + 7 day(s) | + 5 day(s) | + 3 day(s) |
| AMEX | + 14 day(s) | + 7 day(s) | + 5 day(s) | + 3 day(s) |
Example
From the table above, we can deduce that an iDEAL payment for 'In control' merchants can be paid out the next business day. VISA credit card payments for 'Key exclusive' merchants become available after 5 days and can be cleared from that moment on.
Curious if you qualify for 'Key exclusive merchant'? Contact your account manager for the terms and conditions.
View payout speed
The payout speed is listed on the 'Financial Overview' page. To check the current payout speed, follow these steps.
View payout speed
-
In the Admin Panel, go to the Merchant tab » Invoices (Clearing) https://admin.pay.nl/balance .
-
Under 'Settings', you will see the field ' Payout speed Image: View payout speed' , next to which it states which payout speed the merchant falls under.
5. Clearing frequency
Set clearing frequency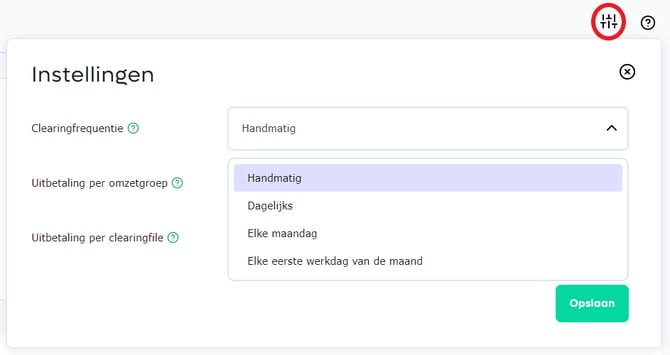
Within your PAY. account, you can decide when you want to receive your payout. PAY. offers the following clearing frequencies for every package:
| Frequency | Description |
|---|---|
| Daily | It is checked every working day whether there is an available balance that can be paid out to the merchant. |
| Weekly | Every Monday, it is checked whether there is an available balance that can be paid out to the merchant. |
| Monthly | It is checked on the first working day of every month whether there is an available balance that can be paid out to the merchant. |
Set clearing frequency
The clearing status is listed on the 'Financial Overview' page. To check the current clearing status, follow these steps.
-
In the Admin Panel, go to the Merchant tab » Invoices (Clearing) https://admin.pay.nl/balance
-
Under 'Settings', you will see the Clearing frequency field. Image: Setting clearing frequency . Here you can select your desired frequency.
-
Click the 'Save' button at the bottom of the page to apply the change.
Availability
Below you will find the available clearing frequencies per package.
 Pioneer Pioneer |
 Professional Professional |
 Business Business |
 Corporate Corporate |
|
|---|---|---|---|---|
| Daily | ✔️ | ✔️ | ✔️ | ✔️ |
| weekly | ✔️ | ✔️ | ✔️ | ✔️ |
| monthly | ✔️ | ✔️ | ✔️ | ✔️ |
6. Clearing status
Clearing active
Clearing frozen
Clearing not yet necessary
PAY. has the following clearing statuses:
| Status | Description |
|---|---|
| Clearing active (everything in order) Image: Clearing active |
All documents have been approved and the internal audit has been successfully completed. The merchant can receive clearings. |
| Clearing frozen Image: Clearing frozen |
The clearing has been frozen by PAY., meaning the merchant cannot receive clearing. Please contact your account manager for more information. |
| Clearing not yet necessary Image: Clearing not yet necessary |
Not all documents have been checked yet and/or the internal audit has not yet been completed. The merchant cannot receive clearings at this time. |
Check status
The clearing status is listed on the 'Financial Overview' page. To check the current clearing status, follow these steps.
-
In the Admin Panel, go to the Merchant tab » Invoices (Clearing) https://admin.pay.nl/balance
-
Under 'Status', you will see the Payout status field listed, followed by the merchant's clearing status.
Check clearing
Check progress?
Have you submitted all the required documents and are you waiting for your clearing to become active? Via the 'click here' link (Image: Check clearing ) listed next to the payout status, a popup opens showing both the status of the required documents and the internal check. You can see at a glance which documents are currently being checked or which documents you still need to submit.
7. Payment history
You can see the payment reference in the first column.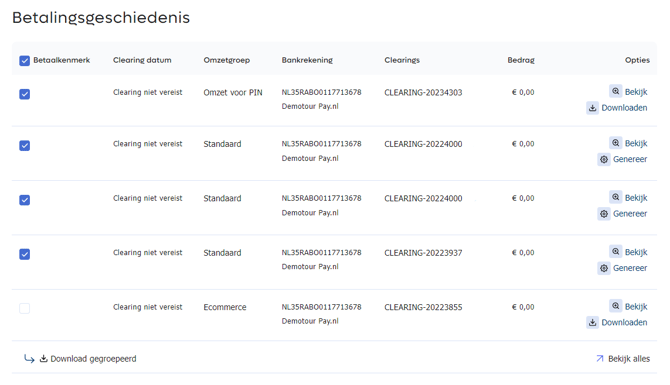
You can see the PAY. payment reference under 'Transaction reference'.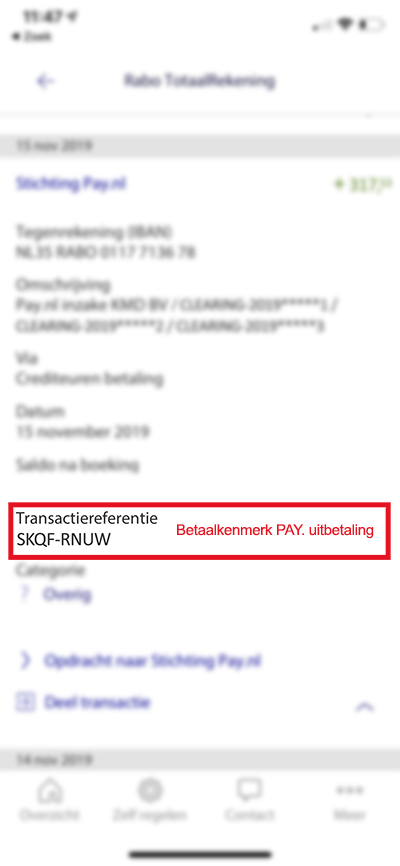
This table shows all clearings that have already been paid out. The table consists of 7 columns:
-
Payment identifier: The payment identifier is located in the Transaction Reference of the payment to your IBAN account number. You can also find this unique reference in the clearing history. This way, you know which accounting file corresponds to which payment. This is very useful if a payment contains multiple Clearings. The format of a payment identifier consists of 2 sets of 4 digits or letters separated by a hyphen (for example: SKQF- RNUW, see the examples on the right).
-
Clearing date: The date on which the payment took place. If the message "Clearing not required" is displayed, no clearing takes place, for example because the book balance is insufficient for the upcoming clearing round.
-
Revenue group: The revenue groups column is only displayed if revenue groups are active and the clearing function per revenue group is active. The column reflects the name of the revenue group.
-
Bank account: In the Account number column, you will see the IBAN account number to which the payment is made.
-
Clearings: A payout may consist of multiple Clearings. In this column, we display the different Clearing IDs for multiple Clearings.
-
Amount: This column shows the amount being/has been paid out
-
Options:By default, this column shows the "Generate" option. Once the accounting file has been generated, this column shows the "Download" option.
8. Future clearings
Overview of future clearings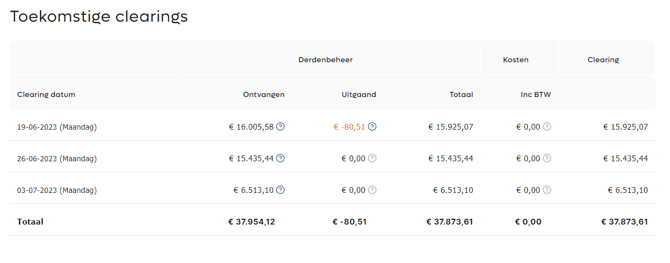
Open popup with clearing details
Number of transactions per payment method in a clearing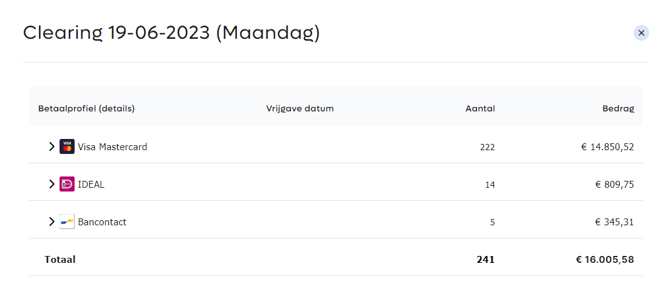
Number of transactions per date in a clearing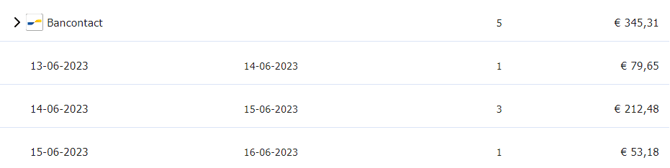
Each payment method has its own payout speed, which means you often have to deal with outstanding balances.
The upcoming clearings are 'expected' payout dates. If the payments are forwarded to PAY. by the payment option earlier (for example, in the case of pay later), the release period is automatically brought forward.
The 'Future clearings' table (Image: Overview of future clearings) gives you an overview of these outstanding balances and also shows the date on which a clearing is scheduled for you.
View future clearings
To view future clearings, follow the steps below:
-
In the Admin Panel, go to the Merchant tab » Invoices https://admin.pay.nl/balance
-
Under 'Future clearings', you see a table with the following columns. Image: Overview of future clearings
-
Clearing date
Here you will find the dates on which a clearing is scheduled. In the image, you can see that 3 clearings are scheduled for these merchants. Third -party management
In this column, you will find the total amounts of your transactions in the sub-column 'Received'. If a refund or direct debit reversal has occurred, an additional sub-column 'Outgoing' will appear with the total amount of these chargebacks . Costs
This column displays the transaction costs including VAT. Transaction costs are booked immediately. This is also the reason why you see costs listed for the upcoming clearing in the image, but not yet for the other 2 clearing dates. Clearing
This column is the balance of the columns 'third-party management' and 'costs' and therefore contains the amount currently scheduled to be cleared to you. Naturally, the quantities change the moment a new order comes in.
-
-
If a blue info icon is displayed next to a payment Image: Opening popup with clearing details , you can see how the amount is made up. To do this, click on the info icon.
-
A popup opens. In the example Image: Number of transactions per payment method in a clearing, we see that the amount of € 1,726.50 is made up of 3 iDEAL, 1 Bancontact, and 1 credit card transaction.
-
If you want to see the dates on which these transactions were completed, click on a payment option. The total amount and number of transactions for this payment option will then be specified per date on which the order was paid. Image: Number of transactions per date in a clearing
The total value in the clearing column is equal to your book balance.
9. Various bank accounts
With PAY., you have the option to have your funds paid out to different account numbers. You can add an account for every webshop / sales location where you offer our payment solutions.
Activate revenue group
Activating multiple account numbers
Activate option for multiple account numbers
The 'multiple account numbers' option is not activated by default. You can activate this option via the 'Change package options' link on the Merchant » Company tab https://admin.pay.nl/my_merchant . Ensure that both the 'Revenue groups' option (Image: Activate revenue group) and 'Multiple account numbers' (Image: Activate multiple account numbers ) are checked in the popup.
Need help activating?
You can find more information about activating a package option here . Do you want to use the 'multiple account numbers' option, but your current package does not support it? Then you can upgrade very easily .
Add extra bank account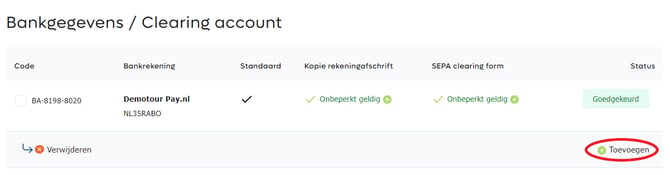
1. Add an extra bank account
After you have activated the 'multiple account numbers' option, it is possible to add one or more additional bank accounts. To do this, follow the steps below:
-
In the Admin Panel, go to the Merchant » Company tab https://admin.pay.nl/my_merchant .
-
Under 'Bank details / Clearing account', you now see an option to add an account. Image: Add extra bank account.
-
Click on the 'Add' link and add an account via IBAN verification using iDEAL or by adding a copy of the bank account.
Please note: Additional bank accounts added must first be approved by our 'Acceptance' department before they can be used in a clearing.
Add bank account to revenue group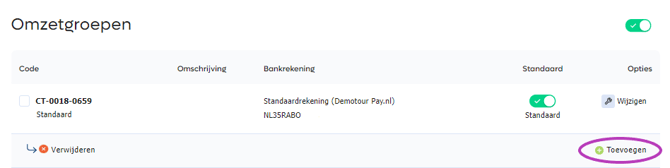
Add bank account to revenue group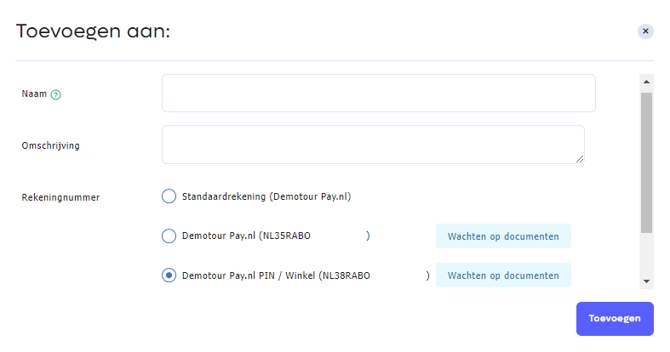
New account added to a revenue group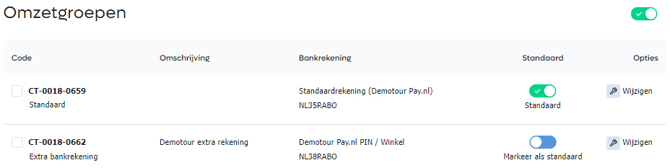
2. Link additional bank account to revenue group
As soon as the bank account has been approved, it can be linked to a revenue group. To do this, you must follow the steps below:
-
In the Admin Panel, go to the Sales Locations tab https://admin.pay.nl/programs/programs .
-
Under 'revenue group', you see the available revenue groups with the linked bank accounts. In the example in Image: Add bank account to revenue group, you can see that there is one revenue group named 'Standard' with the linked bank account NL35RABO0117713678.
-
We are now going to create a new revenue group with the additional bank account we want to use. To do this, click on the 'add' link. Image: Add bank account to revenue group .
-
In the popup that now opens (Figure 86) , we see the following fields: Name , Description , and Account number .
-
Fill in these fields. Choose a unique name that you can easily recognize later. Under "account number", select the additional bank account you just added.
-
Click the 'Add' button in the bottom right of the popup. You will return to the overview of sales locations. Image: New account added to a revenue group . In our example, we have added the extra bank account to the revenue group named 'Extra bank account'.
3. Link revenue group to a sales location
In this final step, we will link the revenue group you just created to a sales location (webshop). To do this, follow the steps below.
Change sales location
Link revenue group to sales location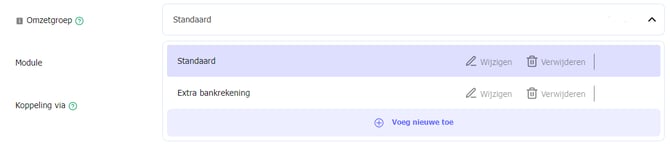
-
In the Admin Panel, go to the Manage tab » Sales Locations https://admin.pay.nl/programs/programs .
-
Select the sales location from which you want the funds paid out to the extra bank account. Click on the change link for the relevant sales location. Image: Change sales location .
-
Under 'Module', you will see the Revenue Group field . Select the revenue group you just added there. Image: Linking a revenue group to a sales location .
-
Click the 'Edit' button at the bottom of the screen to save the changes. From now on, the credits for this sales location will be paid out to the additional account number linked to the revenue group just selected.
Availability
Below you will find in which packages this option is available.
| Pioneer |
Professional |
Business |
Corporate |
|
|---|---|---|---|---|
| Multiple account numbers | ✖️ | ✖️ | ✔️ | ✔️ |
10. IBAN Verification
Change or add account number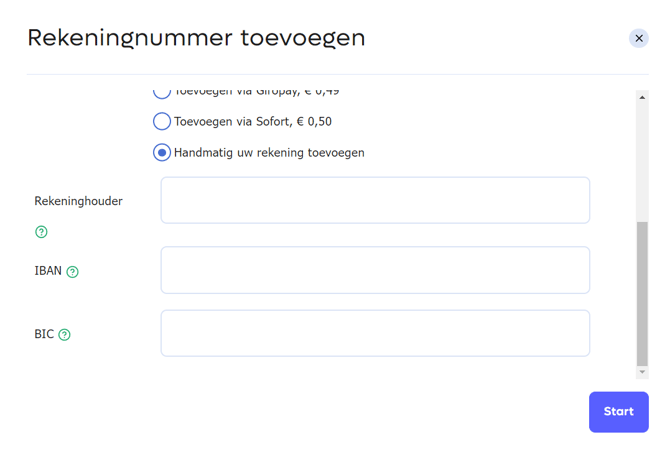
Add via online payment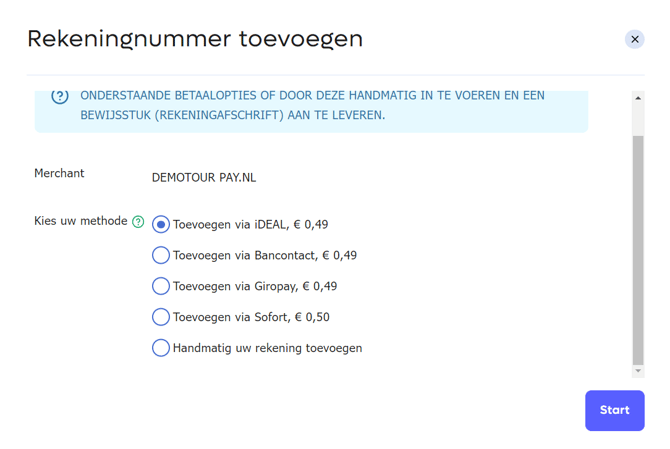
Do you want to quickly change or add bank details? Then use the IBAN verification method.
You hereby make a payment from the account you wish to add. We then receive the account holder's name and IBAN number for this transaction and add them to your bank details.
To use the IBAN verification method, follow the steps below.
-
In the Admin Panel, go to the Merchant » Company tab https://admin.pay.nl/my_merchant
-
Under 'Bank details', you will see the Account holder field . Click on the link 'Add account number'.
Image: Change or add account number
-
In the popup that opens, select Add via iDEAL, Bancontact, SOFORT, or MyBank.
Image: Add via an online payment
-
Click the 'Start' button in the bottom right of the popup; the selected payment screen will now open.
-
Select the desired bank and pay the amount of €0.49 displayed on the screen.
-
After the payment, the IBAN number, BIC code, and account holder name of the account from which you just made the payment will be displayed in your bank details.
Currently, verification via IBAN is only possible through iDEAL, Bancontact, SOFORT, and Mybank. If you are unable to use one of these payment methods, you can attach a copy of a bank statement.
11. Advanced options
In addition to the standard settings, it is possible to use the following advanced clearing options.
-
Adjust booking period
By default, we use a monthly booking period. Revenue is then grouped by month. However, via the advanced options, you can also choose to set the booking period to 'weekly'.
-
Collecting Clearing
Every payment option has a so-called "release period," meaning that, for example, a credit card payment on the last day of the month will not be paid out until at least 5 days later. If you want all revenue for a single period on one invoice, select the option 'as soon as all revenue for the period has been released'.
-
MT940 account number
Modifying the account number in the header of the MT940 file.
-
Email clearing specification
By default, every account with the correct permissions receives an email with the clearing / invoice. However, if you also wish to receive the specifications, you can indicate this via the 'Email clearing specifications' field.
-
Split by revenue group
For a separate clearing overview on your invoice per revenue group. You can receive multiple overviews per period, but you will have insight into the relevant category on the invoice.
Activate advanced clearing options
Activate advanced options
The 'advanced options' are not activated by default. You can activate this option via the 'Change package options' link on the Merchant » Company tab https://admin.pay.nl/my_merchant . Ensure that the 'Advanced clearing' option is checked in the popup . Image: Activate advanced clearing options .
Need help activating?
You can find more information about activating a package option here . Do you want to use the advanced clearing options, but your current package does not support this option? Then you can upgrade very easily .
Set advanced options
After you have activated the advanced options, they become available in the 'Financial Overview'. To apply changes, follow these steps.
-
In the Admin Panel, go to the Merchant tab » Invoices (Clearing) https://admin.pay.nl/balance .
-
Under 'Settings', you will see the new fields Clearing from , MT940 Account number , E-mail clearing specification , Split by revenue group , and for the Posting period field, you can select the Week option .
-
Change the new fields to the desired settings and click the 'Save' button at the bottom of the page.
Do you have questions about how one of the advanced clearing options works? Your account manager will be happy to tell you more about it.
Availability
Below you will find the available advanced options per package.
 Pioneer Pioneer |
 Professional Professional |
 Business Business |
 Corporate Corporate |
|
|---|---|---|---|---|
| Adjust Booking Period | ✔️ | ✔️ | ✔️ | ✔️ |
| Clearing collect | ✔️ | ✔️ | ✔️ | ✔️ |
| Set up MT940 account number | ✔️ | ✔️ | ✔️ | ✔️ |
| Email clearing specification | ✔️ | ✔️ | ✔️ | ✔️ |
| Split invoice by revenue group | ✖️ | ✖️ | ✔️ | ✔️ |