
Do you ever send a payment link to your customers? Or would you like the option to add an iDEAL link to your invoices? Via PAY.'s dynamic payment link module, you can create a payment screen within 5 minutes where your customers can make a payment. The dynamic payment link module offers the options below to customize and secure the payment screen.
- Amount
You can set a free amount, a minimum, maximum, or fixed amount. - Free Fields
Via 3 optional free fields, you can add extra information to the payment or ask your customer to enter, for example, a name or email address. You can also use the free field to provide a value. Think, for example, of a customer number that you fill in in advance. - Payment Methods
Of course, you decide for yourself which payment option you want to offer your customers. - Custom Thank-You Page
After a successful payment, the customer is by default redirected back to the payment screen where the message 'thank you for your payment' is displayed. However, it is also possible to redirect the visitor to a custom thank-you page. - Country and Language
You can set a default country and language for the payment screen. The payment options are displayed grouped by country. The customer can change the default language to the desired language at the top right of the payment screen.
Using the extensive link generator, you can create a dynamic payment link in no time. Unlike the one-time payment link, this link remains valid indefinitely. Depending on your security setting, you can even dynamically include amounts and extra fields (such as order numbers). Dynamic payment links are therefore excellently suited for use in, for example, digital invoices.
1. Payment Screen
PAY.'s payment screen for dynamic payment links looks as follows:
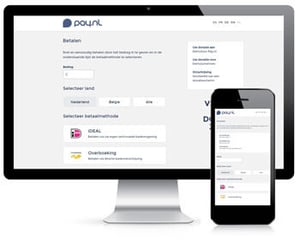
The payment screen is responsive, accepts payments in euros, and is available in the following languages:
 Dutch
Dutch English
 German
 French
 Spanish
 Italian
Demo
- View the payment screen for dynamic payment links
2. Setting Up the Payment Link Module
Before we can create a dynamic payment link, we first need to create a sales location for it once. Follow the steps below to do so.
 Adding a Sales Location
Select Module and Connection

Select Payment Options
Enter Communication URL

Enter Success and/or Error URL

Set Up Notification

- In the Admin Panel, go to the Sales Locations https://admin.pay.nl/programs/programs/.
- In the 'Sales locations overview', click the 'add' link Image: Adding a sales location to create a new sales location.
- General Information
Under 'General information', you will find the following fields:- Name of the Sales Location
Choose the name of your sales location. This name appears in your statistics. - Publication / URL
Describe where you will offer or promote the sales location. For example, http://www.uwwebshop.nl/. Are you going to offer the same sales location via different locations? Then you can list them all in this field, separated by a comma. - Category
Choose the category your sales location falls under here. Always choose the category that matches best.
- Name of the Sales Location
- Module
Under 'Module', you will find the following fields:- Name of the Location
The text you enter here will be displayed on the payment screen under 'Your payment for'. - Describe the Sales Location
Give a short description of the sales location. This will be displayed at the top right of the payment screen. - Module
Select the module Payment Links Image: Select module and connection. - Connection via
Select the submodule Dynamic Payment Link Image: Select module and connection.
- Name of the Location
- Payment Options
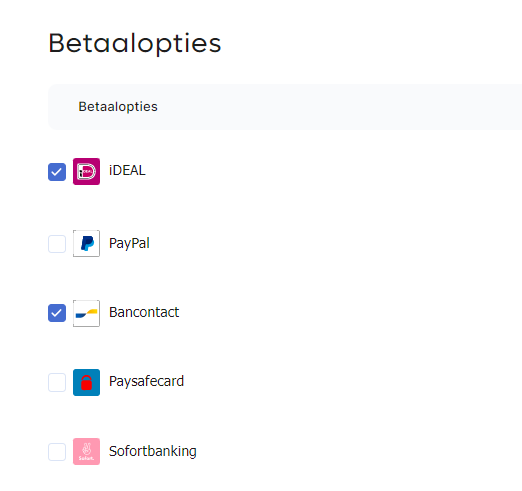
After you have set the 'module' and 'submodule', the list with all available payment options for the dynamic payment link module appears. Check the checkbox for a payment option to enable offering it to your customers Image: Select payment options.Not sure which payment option to select? Then check out our payment methods documentation. Here you will find all the information about the payment options offered by PAY. - Communication URLs
You can set this at No, do not use a communication URL Image: Enter communication URL.- Advanced
You can of course make use of exchange calls so that every status change is communicated to your server.
- Advanced
- After Payment
After a successful payment, the customer is by default redirected back to the payment screen where the message 'thank you for your payment' is displayed. However, if you want to redirect the customer to your own custom page, you can make use of the Success URL and/or Error URL field. Image: Enter success and/or error URL.- Advanced
We pass the parameter orderId to the Success URL and Error URL. Using this parameter, you can retrieve transaction details.
- Advanced
Depending on your package it is possible that more fields are displayed than the fields mentioned above. Contact your account manager if you have any questions about this.
3. Creating a Payment Link
Selecting a Sales Location for a Dynamic Payment Link
Setting Up a Dynamic Payment Link
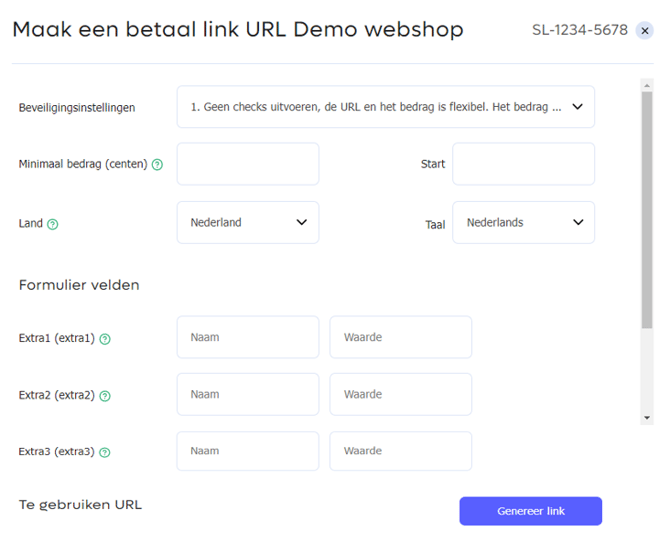
We have now created a sales location that we will use to create a dynamic payment link. We can add various characteristics and security settings to this dynamic payment link. Setting up and generating a dynamic payment link works as follows:
- In the Admin Panel, go to the Sales Locations https://admin.pay.nl/programs/programs/.
- In the 'Sales locations overview' you will find the sales location you just created. The column Connection via contains the value Dynamic Payment Link.
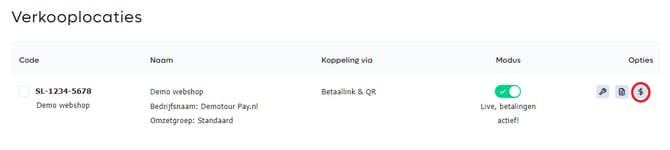
- We will now set the characteristics of the dynamic payment link by clicking the 'Create Link URL' link Image: Selecting a sales location for a dynamic payment link to click.
- In the popup that now opens Image: Setting up a dynamic payment link we see the following general fields:
- Security Settings
It is possible to create payment links with four different levels of security, allowing you to lock in variables and amounts.security settings
A detailed explanation of the various security settings can be found here. - Minimum Amount
This is an optional field. If you enter a value here (in cents), end users cannot pay an amount lower than this value.Start
This is an optional field. Do you want a 'default' amount to be displayed? Then enter the desired value in cents here. - Country
Depending on the chosen payment options of the sales location, these are grouped by country. For example, iDEAL for the Netherlands, Bancontact for Belgium. If you want the payment methods for, for example, the Netherlands to be displayed as 'default', you can select that here. - Language
Select the 'default' language of the payment screen here.
- Security Settings
- Form Fields
Under 'Form fields' we can display a free field on the payment screen where the end user must enter their details. Think, for example, of an email address. There are a maximum of 3 free fields that you can use/display on the payment screen.- Extra1
Here you can enter a label Name and a default Value. For example, do you want to ask the end user for an email address? Then enter Name for example 'Email address' and leave the value blank, of course.
- Extra1
- Once you have entered the desired fields, click the 'Generate link' button. The link that is then displayed can be tested by clicking it. Not satisfied? You can simply make a change and generate the link URL again.
Tip: A generated dynamic payment link can in some cases contain quite a lot of characters. Using a URL shortener such as Bitly you can easily convert it into a short URL.
4. Security Settings
When generating a dynamic payment link, you have the option to choose between 4 different levels of security. Using an example, we will show the differences between these 4 settings.
Example
In this example, we set a minimum amount of € 1,00 with a default Amount of € 5,00 We also make use of the extra fields. We would like to know the Name and the Email address of the customer. Finally, we use 1 extra field with the label Customer number in which we pre-fill the value Customer 1234 in advance.
| Option | Example URL | Explanation | ||||||||||||||||||||||||
|---|---|---|---|---|---|---|---|---|---|---|---|---|---|---|---|---|---|---|---|---|---|---|---|---|---|---|
| 1 | URL with option 1 | No checks are performed. The amount, labels, and values can all be adjusted in the URL. The table below shows which fields can be adjusted in our example.
|
||||||||||||||||||||||||
| 2 | URL with option 2 | Only the amount is fixed; the labels and values can all be adjusted in the URL.
|
||||||||||||||||||||||||
| 3 | URL with option 3 | The amount is fixed, as is the URL. Only values can still be changed.
|
||||||||||||||||||||||||
| 4 | URL with option 4 | All variables are fixed and cannot be changed.
|
Don't forget to watch our YouTube video for a step-by-step explanation.
Availability
Below you will find within which packages the dynamic payment link module is available.
 Pioneer Pioneer |
 Professional Professional |
 Business Business |
 Corporate Corporate |
|
|---|---|---|---|---|
| Dynamic payment links | ✔️ | ✔️ | ✔️ | ✔️ |
Video
Dynamic Payment Links
Instructional video on setting up the module and generating dynamic payment links.