
'Afletteren' is a term from the accounting world, a corruption of 'afvinken' (checking off) — ''afpunten'' in Flemish — referring to the processing of payments. Afletteren means linking a payment to an outstanding item; in English this process is known as reconciliation.
After reconciling, you have processed an outstanding invoice. The outstanding invoice then disappears from your bookkeeping, and your bookkeeping is updated accordingly. By reconciling regularly, you keep your financial administration continuously up to date, giving you access to current figures. The advantage of up-to-date bookkeeping is that you can make business-critical decisions based on current figures.
1. Reconciliation Moment
You can export your payments via PAY. to update your accounting software. Before you start reconciling, you need to determine the moment of reconciliation. There are three moments at which you can do this:
- Based on the payout to your IBAN account
- Based on paid transactions on a daily, weekly, or monthly basis
- Based on the exchange URL
Per payout to your IBAN account
You receive one or more batch payments per day from PAY. Before you can reconcile the individual items in your bookkeeping, these payments must be broken down. After all, you need to know which payments are included in this batch. With each payout, you receive a transaction detail file from us, in MT940, CSV, or another format. By placing the received batch payment on a suspense account and linking it to the detail file, you can link these 2 payments to each other. This way, upon receipt of the payment, you reconcile all related items at once. The disadvantage of this is that your bookkeeping only marks the items as paid once PAY. has actually transferred the payment to you. Certain payment options are transferred with a delay. This means that an invoice in your bookkeeping paid via Riverty will be marked as unpaid until the funds have actually been transferred to you.
Paid transactions on a daily, weekly, or monthly basis
If a payment is successful, it is placed in your account balance. You can compare this to the balance on a bank account. At the moment of crediting, you become the owner of the funds and the funds can be considered 'received'. At that moment, you can therefore also mark your items (receivables/invoices) as paid (reconcile) in your bookkeeping system. The advantage of this is that you have immediate insight into paid invoices, even if you have not yet received the actual payout to your account.
Exchange URL
Updating your bookkeeping system based on the exchange is the least commonly used method. If an exchange request fails, you can apply a retry schedule, but logging actions are limited to 35 days. PAY. reports every status change to your exchange URL. If a payment succeeds, is reversed, or undergoes another status change, PAY. will report this. It is possible to specify multiple exchange URLs for your sales location. This way, in addition to changing the status of the order, your bookkeeping system can also be updated directly.
2. Manually Paid Transactions
If you want to manually export the payments for a specific day or period, you can do this via the statistics using the 'download CSV' display method.
For more information, see Statistics » Paid Transactions.
3. Manually per Clearing
Financial insight
Maximum financial insight with PAY.:
- Financial specifications in any desired format
- Clear invoices
- Easy reconciliation of transactions.
It is possible to export invoices, clearings, and transaction specifications to a CSV, MT940, or PDF format so that you can import them into your favorite accounting software. By default, you can export the data for one payout. From the Professional package onward, however, it is possible to generate an export for a specific period.
The export that is generated is a zip file containing the following 4 folders:
- Transactions
This folder contains a CSV, PDF, and MT940 file containing all the specifications of the transactions paid out to you via the clearing. - Clearings
This folder contains a PDF file with the extensions. - Invoices
This folder contains a PDF file with the invoices. - Summary
This folder contains a number of PDFs with management information: turnover per day and payment option, or per turnover group and vice versa. The content depends on the settings within PAY.
View all payouts
Generate export
Download export
Exporting a clearing
To export a clearing, follow these steps:
- In the Admin Panel, go to the tab Merchant » Invoices https://admin.pay.nl/balance
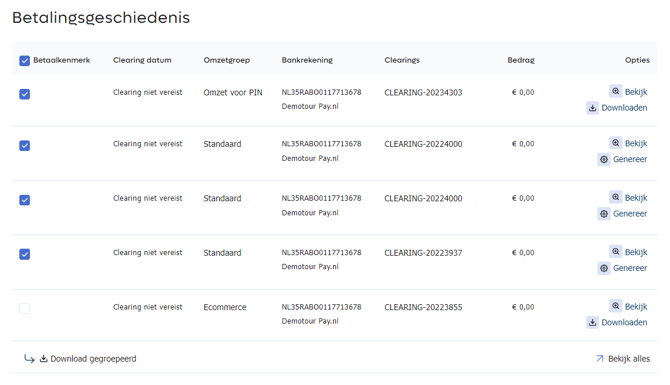
- Under 'Payment History', you will see a table with the last 5 payouts. If you want to export an earlier payout, click the 'View all' link Image: View all payouts
- Select the payout for which you want to receive the export. Then click the 'Export' link in the options column of this payout Image: Generate export
- A zip file is now being generated. This may take a few moments. Once the export file is ready, you can download it via the options column Image: Download export
Activating the Export of Multiple Payouts

Option: export multiple clearings
From the Professional package onward, it is possible to export multiple clearings at once. You will then receive a single MT940, PDF, and CSV file with all the data for a selected period. The 'export multiple clearings' option is not activated by default. You can activate this option via the 'Change package options' link on the Merchant » Company https://admin.pay.nl/my_merchant tab. Make sure that in the popup, the option 'Export multiple clearings' is checked. is aangevinkt.
Need help activating this?
More information about activating a package option can be found here. Do you want to use the 'multiple account numbers' option, but your current package does not support it? Then you can very easily upgrade.
View All Payouts
Exporting Multiple Payouts
Exporting multiple clearings
To export multiple clearings at once, follow the steps below:
- In the Admin Panel, go to the tab Merchant » Invoices https://admin.pay.nl/balance
- Under 'Payment History', you will see a table with the last 5 payouts. If you want to export earlier payouts, click the 'View all' link Image: View all payouts
- Select the checkboxes of the payouts for which you want to generate an export file Image: Exporting multiple payouts
- Click the 'Download grouped' link below the table. The export file is now being generated. This may take a few moments. Once the export file has been generated, it will be offered for download.
4. Automatically via Sync Module
PAY.: Setting up the Sync Module
A walkthrough for installing PAY.'s Sync module.
With the PAY. Sync module, you can share transaction data with external parties. PAY. can automatically send specification files to people or departments who can use them to manually import into your accounting system.
People and partners within your business or network
- Users linked to your business
- External email addresses
- SFTP (uploading files to your servers)
- API (push to your own API endpoint)
5. File Formats
Depending on the chosen synchronization partners, the Sync module can export different formats.
- MT940 (financial bank statement file)
- CSV (minimal)
- CSV (with customer data)
- Coda XML (Belgian bank statement file)
6. Creating a Synchronization Task
Creating Synchronization Tasks
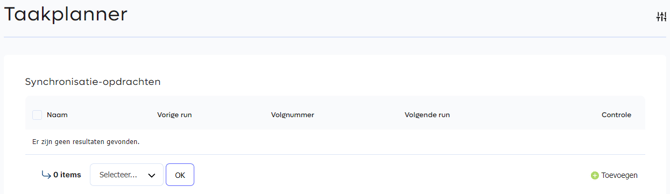
You create a synchronization task via the Merchant » Tasks menus. If no synchronization task has been created yet, you will see an empty overview. Click the button in the bottom right Add
7. Editing a Synchronization Task
Editing Synchronization Tasks
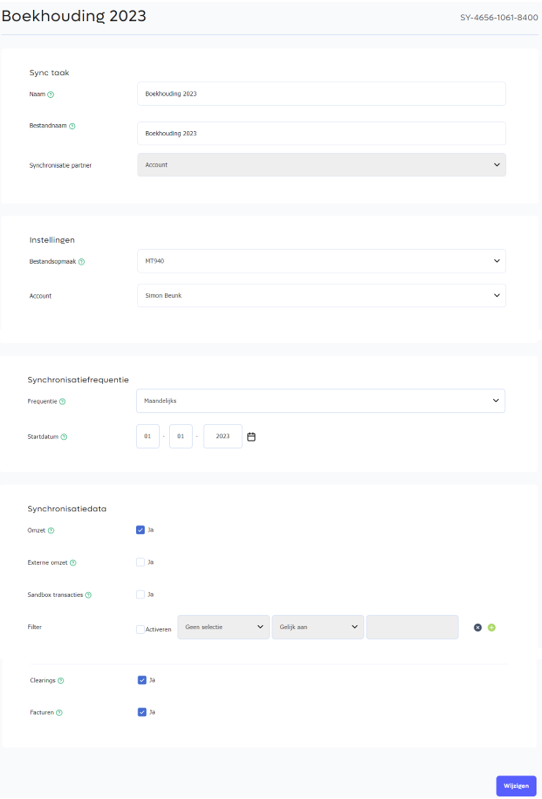
- Name: This field is shown as the file name of the synchronization job, followed by the date and sequence number.
- Synchronization partner: The type of connection you selected during creation.
- File format: Select the file format that corresponds to the desired layout of your (accounting) system.
- Synchronization frequency: The synchronization module can synchronize your transactions from the period since the last sync job with your system on a daily, weekly (every Monday), or monthly (first day of the month) basis. It is also possible to run the synchronization based on the paid-out clearing.
- Start date: The date from which the data should be synchronized. If set in the past, synchronization will start within 5 minutes.
- Turnover: Payments where the money flow runs via PAY. These funds are received on your behalf by Stichting Pay.nl and paid out to your account in a batch. For example, iDEAL, credit cards, and Bancontact.
- External turnover: For certain payment options, PAY. acts only as a gateway, or there is no money flow involved. In these cases, payments are placed directly from the relevant payment option into your account (or a wallet). For example, with PayPal or a proprietary gift card.
- Clearings: Select this option if you also want to include the payouts to your clearing account(s) in your export. For a complete status of your PAY. account balance in your own administration, both the invoices and the clearing files need to be imported.
- Invoices: Select the invoices that are settled by PAY. via your account balance and that you want to include in your export. If you only want to reconcile transactions (turnover), leave this unchecked.
27.7.1 API
Do you use the Professional or Business package. Then you can send your transaction data to an API URL. As the recipient of our transaction data, you must provide your own API URL.
- API URL: The API URL to which PAY. may send the transaction specifications.
PAY. calls the entered API URL to send the data in the desired format. If the format is JSON, you can retrieve the data as follows:
$data = (array) json_decode(file_get_contents('php://input'), true);
For MT940 and other formats, use:
$data = (array) file_get_contents('php://input');
27.7.2 SFTP
Do you use the Professional or Business package. Then you can transfer your transaction data via an SFTP connection. As the recipient of our transaction data, you must provide your own SFTP host.
- SFTP Host: Enter the IPv6 IP address of the host, without prefixes.
- Port: Port number for the SFTP connection. Usually 443.
- Username: Request a dedicated username for PAY. with write-only access to a specific folder.
- Password: Password belonging to the username.
- Folder: Folder in which the document is stored.
27.7.3 (External) Email Address
Do you use the Professional or Business package. Then you can send your transaction data to an (external) email address.
Note: the exports may contain customer data. Make sure there is a proper data processing agreement in place with the party the data is sent to, or choose a file format without customer data.
- Email address: An email address to which transaction data should be sent. This may be an email address that is not registered in PAY.'s Admin.
27.7.4 Yuki Accounting
Do you use the Pioneer package or higher? Then transaction data can be reconciled directly with our accounting partner Yuki. Once you have created a new synchronization task, our system automatically directs you to the Edit synchronization task screen. Fill in all required fields here:
- Email address: The email address of your Yuki inbox within Yuki's accounting system.
- File format: Select Yuki (with customer data) as File format
27.7.5 e-Boekhouden
Do you use the Pioneer package or higher? Then you can reconcile your transaction data directly with our accounting partner e-Boekhouden.
- File format: For e-boekhouden, select MT940 as File format
- Security code 2: You can find this code in your E-boekhouden account. Select the button Beheer, then Instellingen and then for the API/SOAP. Note: use security code 2.
- General ledger:You must specify the general ledger account to which this account is linked. If you have not yet created a general ledger account in E-boekhouden.nl, go to: Beheer, Grootboekrekeningen and there select Toevoegen.
27.7.6 Twinfield
Do you use the Pioneer package or higher? Then you can reconcile your transaction data directly with our accounting partner Twinfield. Once you have created a new synchronization task, our system automatically directs you to the Edit synchronization task screen. Fill in all required fields here:
- File format: For Twinfield, select Twinfield XML as File format
- Username: Username, received upon registration with Twinfield.
- Password: Password for your organization that you received from Twinfield. Note: make sure you have the correct authorizations. This password is stored encrypted. If your password changes, add a new synchronization job.
- Organization code: Code for your organization. For more information, consult Twinfield or your intermediary.
- Office Code: If you are a Twinfield reseller or manage multiple administrations and log in with a main user, you can enter the Office Code here. You can find this in Twinfield by going to Algemeen and then selecting Administratie wisselen.
8. Available Sync Views CSV
PAY. provides, per synchronization partner, multiple sync views. A sync view is nothing more than the layout of the accounting file in CSV. In the table below you will find an overview of all the columns we make available and in which sync view you can find them.
If you have a question about the layout of, for example, the MT940 or CODA accounting file, please contact the PAY. Support Desk.
| Format | Column title | CSV (minimum) | CSV (with customer data) | CSV (without customer data) | REPORTING_CSV | REPORTING_CSV (no customer data) | REPORTING_CSV (without account holder name) | CSV (clearing) | CSV (reconciliation sheet per payout) |
|---|---|---|---|---|---|---|---|---|---|
| CSV | STATS_ID | ✖️ | ✔️ | ✖️ | ✖️ | ✖️ | ✖️ | ✔️ | ✔️ |
| CSV | TRANSACTION_DATE | ✖️ | ✔️ | ✔️ | ✔️ | ✔️ | ✔️ | ✔️ | ✔️ |
| CSV | TRANSACTION_TIME | ✖️ | ✔️ | ✔️ | ✔️ | ✔️ | ✖️ | ✖️ | ✔️ |
| CSV | ORDER_ID | ✖️ | ✔️ | ✔️ | ✔️ | ✔️ | ✔️ | ✔️ | ✔️ |
| CSV | ORDER_NUMBER | ✖️ | ✖️ | ✖️ | ✖️ | ✖️ | ✔️ | ✔️ | ✔️ |
| CSV | PAYMENT_SESSION_ID | ✖️ | ✖️ | ✖️ | ✔️ | ✔️ | ✔️ | ✔️ | ✖️ |
| CSV | CONSUMER_NAME | ✔️ | ✔️ | ✖️ | ✖️ | ✖️ | ✖️ | ✖️ | ✖️ |
| CSV | CUSTOMER_ID | ✔️ | ✔️ | ✖️ | ✖️ | ✔️ | ✖️ | ✖️ | ✖️ |
| CSV | ✖️ | ✖️ | ✖️ | ✖️ | ✖️ | ✖️ | ✖️ | ✖️ | |
| CSV | DESCRIPTION | ✔️ | ✔️ | ✔️ | ✔️ | ✔️ | ✔️ | ✔️ | ✔️ |
| CSV | PAYMENT_OPTION | ✖️ | ✖️ | ✔️ | ✔️ | ✔️ | ✔️ | ✔️ | ✔️ |
| CSV | PAYMENT_OPTION_ID | ✖️ | ✖️ | ✔️ | ✔️ | ✔️ | ✔️ | ✔️ | ✔️ |
| CSV | TURNOVER | ✔️ | ✖️ | ✖️ | ✔️ | ✔️ | ✔️ | ✔️ | ✔️ |
| CSV | TURNOVER_EXTERNAL | ✖️ | ✖️ | ✖️ | ✔️ | ✔️ | ✔️ | ✔️ | ✔️ |
| CSV | TURNOVER_TOTAL | ✖️ | ✔️ | ✖️ | ✔️ | ✔️ | ✖️ | ✖️ | ✔️ |
| CSV | VAT | ✖️ | ✖️ | ✖️ | ✔️ | ✔️ | ✖️ | ✖️ | ✖️ |
| CSV | COSTS | ✖️ | ✔️ | ✖️ | ✔️ | ✔️ | ✖️ | ✖️ | ✖️ |
| CSV | CURRENCY | ✖️ | ✖️ | ✔️ | ✖️ | ✖️ | ✖️ | ✔️ | ✖️ |
| CSV | EXTRA_1 | ✖️ | ✔️ | ✖️ | ✖️ | ✖️ | ✖️ | ✖️ | ✖️ |
| CSV | EXTRA_2 | ✖️ | ✔️ | ✖️ | ✖️ | ✖️ | ✖️ | ✖️ | ✖️ |
| CSV | EXTRA_3 | ✖️ | ✔️ | ✖️ | ✖️ | ✖️ | ✖️ | ✖️ | ✖️ |
| CSV | CLEARING_ID | ✖️ | ✖️ | ✖️ | ✖️ | ✖️ | ✖️ | ✖️ | ✖️ |
| CSV | CLEARING_FILE | ✖️ | ✖️ | ✖️ | ✖️ | ✖️ | ✖️ | ✖️ | ✖️ |
| CSV | SERVICE_NAME | ✖️ | ✖️ | ✖️ | ✔️ | ✔️ | ✖️ | ✖️ | ✖️ |
| CSV | SERVICE_ID | ✖️ | ✖️ | ✖️ | ✔️ | ✔️ | ✖️ | ✖️ | ✖️ |
| CSV | TURNOVER_GROUP_ID | ✖️ | ✖️ | ✖️ | ✔️ | ✖️ | ✖️ | ✖️ | ✖️ |
| CSV | TURNOVER_GROUP_NAME | ✖️ | ✖️ | ✖️ | ✔️ | ✖️ | ✖️ | ✖️ | ✖️ |