
Overview of Revenue Groups and Sales Locations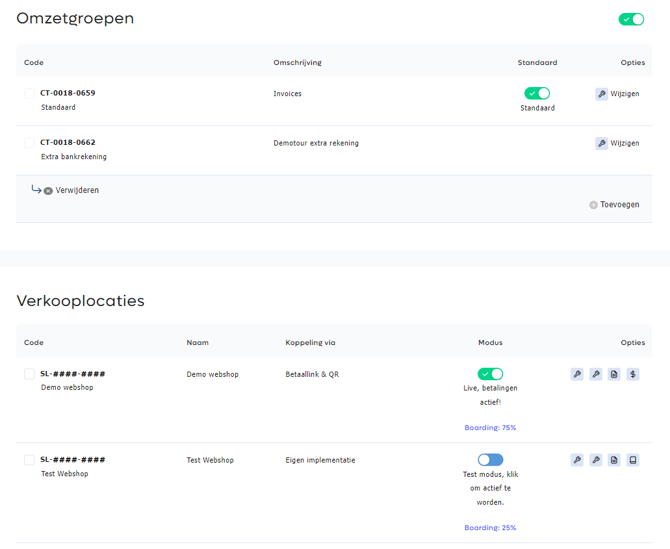
If you want to group your revenue for better insights, or want to split your cash flows across multiple clearing accounts, you can choose the ''activate revenue groups'' option from the Business package. After activation, your current revenue group, 'standard / default', becomes visible first. We recommend giving this an appropriate name right away. Examples of revenue groups are:
The entrepreneur in the Benelux with 5 webshops.
The entrepreneur has 3 websites in the Netherlands, 1 in Belgium, and 1 in Luxembourg. He divides these into 2 revenue groups.
- Revenue group: Dutch webshops
- Belgian and Luxembourg webshops
In the reports, an overview can now be created per 'revenue group'.
The entrepreneur with different verticals
Has hundreds of webshops; part sells electronics and part sells appliances.
- Revenue group: Electronics
- Revenue group: Appliances
The entrepreneur with separated cash flows
Wants to split the online revenue from iDEAL and credit cards from their PIN revenue in the store and the revenue generated by invoice payments via payment links and QR codes.
- Revenue group: eCommerce / online
- Revenue group: PIN / physical store
- Revenue group: Invoice payments
The entrepreneur with different subsidiaries
Has a connection under the parent company and wants to group the revenue of different subsidiaries within 1 account. Invoicing takes place under the VAT number of the parent company, but is still split per revenue group.
- Revenue group: subsidiary 1
- Revenue group: subsidiary 2
- Revenue group: subsidiary 3
Now that the revenue is split, it can also be paid out to a specific clearing account. You simply choose the right clearing account for each revenue group.
Add bank account to revenue group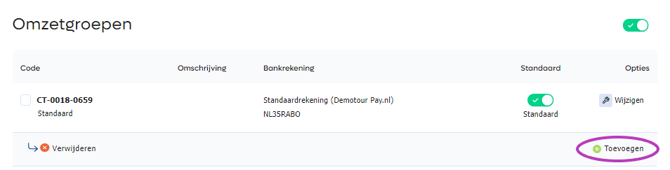
Link revenue group to bank account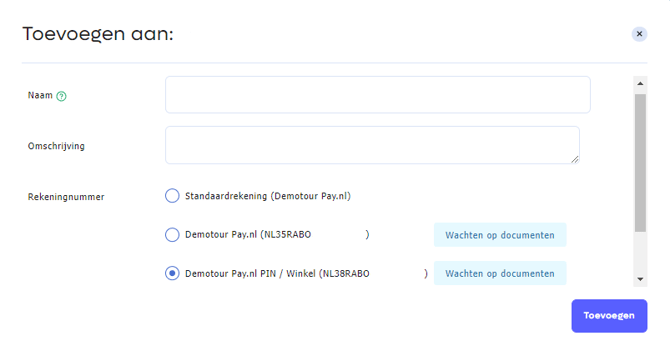
New account added to a revenue group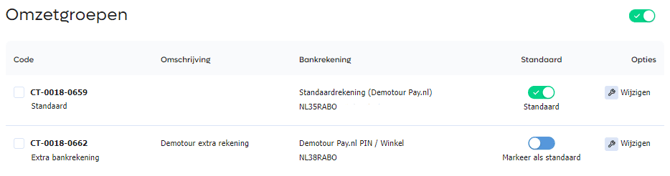
Select payout account for the revenue group
Read how to add extra payout accounts to your business.
If you have created multiple payout accounts, you can link them to your sales locations via the revenue groups. This way, the revenue from a particular sales location is paid out to a payout account of your choice.
- In the Admin Panel, go to the tab Sales Locations https://my.pay.nl/programs/programs.
- At 'revenue group', you see the available revenue groups with their linked bank accounts. In the example in Image: Add bank account to revenue group you see that there is 1 revenue group named 'Standard' with the linked bank account NL35RABO0117713678.
- We will now create a new revenue group with the extra bank account we want to use. To do this, click the 'add' link Image: Add bank account to revenue group.
- In the popup that now opens, Image: Link revenue group to bank account we see the following fields: Name, Description and Account number.
- Fill in these fields. Choose a unique name that you will easily recognize later. For the account number, select the extra bank account you just added.
- Click the 'Add' button at the bottom right of the popup. You return to the overview of sales locations. Image: New account added to a revenue group In our example, we added the extra bank account to the revenue group named 'Extra bank account'.
Link Revenue Group to a Sales Location
In this last step, we will link the revenue group we just created to a Sales Location. Follow the steps below.
Edit Sales Location
- In the Admin Panel, go to the tab Manage » Sales Locations https://my.pay.nl/programs/programs.
- Choose the Sales Location whose balance you want paid out to the extra bank account. Click the edit link. Image: Edit Sales Location.
- At 'Module', you see the field Revenue group, select the revenue group you just added there.
- Click the 'Edit' button at the bottom of the screen to save the changes. Transactions made at this Sales Location will from now on be linked to the chosen revenue group and will therefore be paid out to the extra account number linked to the revenue group you just selected.
Enabling Payouts and Invoicing per Revenue Group
Enable Payout per Revenue Group
It is also possible to set up revenue and invoicing per revenue group. Payouts are grouped by default to generate as few deposits as possible on your bank account. If you want to receive batch payments per revenue group, even though the payout account is the same, you activate this option. Invoices will then also be settled separately. It can happen that you are positive in one revenue category and negative in another.
- In the Admin Panel, go to the tab Merchant » Invoices (Clearing) https://my.pay.nl/balance.
- Check the box at Payout per Revenue Group. This can be found under the heading Settings
Click the 'Edit' button at the bottom of the screen to save the changes. Transactions made on each individual Revenue Group will from now on be paid out and invoiced separately. If you only have one account number linked to your account, revenue groups will also be cleared as separate deposits on your bank account.
Other Revenue and Costs
In exceptional cases, it can happen that no revenue group can be found to book revenue or costs to. For example, for package costs, service fees, or fair-use costs. These costs are tied to the business. In this case, the revenue group marked as 'standard' is used, and the costs are then booked to it.