Skip to content
  • There are no suggestions because the search field is empty.

Business Partners - PAY. Partner Portal

Via PAY.'s partner portal, you can easily manage your customers' accounts and add customers yourself.
There are three ways to add submerchants:

  1. Manually via the Admin Panel (Manage -> Submerchants)
  2. Via our API

To take as much work off your customers' hands as possible and ensure a fast and smooth onboarding, we recommend making the registration as complete as possible right away. Make sure we have the correct directors and UBOs on file from the start, and request the most commonly requested documents from your customer in advance — then nothing stands in the way of a fast onboarding. The most commonly requested documents are (see also our acceptance policy):

  • Copy of UBO identification
    We need to have the full names and percentage interests on file
  • Chamber of Commerce (KVK) extract
  • Business bank account
    This can be done using a copy of a bank statement, a screenshot of the merchant's business banking app, or the merchant can make a one-time payment themselves via online banking


1. Important buttons
mypay-sub-1

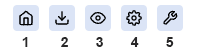
You can find your submerchant overview under the tab Manage > Submerchants. From this menu you can perform a number of actions:

  1. House: once you've received access permission from your customer, this allows you to impersonate the merchant account (view and make changes).

    See also "How do I view my customer's account"

  2. Folder: use this button to download the documents submitted for this account

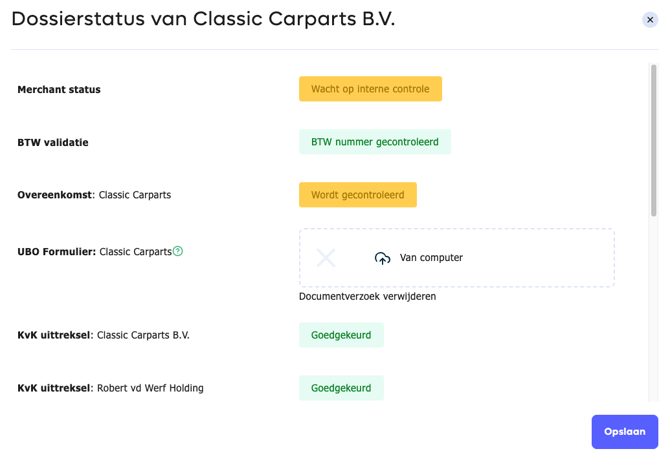
  3. Eye: view your customer's file status (and quickly add documents as well)

    See also "Uploading documents"

  4. Gear: option to add extra documents

  5. Wrench: quickly and easily retrieve the connection details (SL code, AT code, and API Token)

    See also "Where do I find my customer's connection details"

For Alliance accounts, it is not necessary to impersonate accounts. This is because this account manages all connections and also initiates transactions itself using a master token. Customers of Alliances don't need access to PAY.'s admin.


2. Manually adding a submerchant (action: partner)

To add a submerchant via the Admin Panel, go to:

  1. Manage > Submerchants. Here you'll also find an overview of your submerchants.

  2. At the bottom of the page, click the Add button.

    To open this menu directly, click here (make sure you're logged in to the admin).

Manage -> Submerchantsmypay-sub-2

Add (bottom right)
Incasso aanmaken 1

In the next window, you can enter the details of the customer you want to add. Depending on the type of partnership your company has with PAY., you'll have different package options to choose from for the submerchant. If your company has multiple partnership types with PAY., select the connection type.

Enter the submerchant's details:

Select connection type and package

Submerchant handmatig toevoegen1

Variable Value Obliged
Partnership Select the connection type to add here. Depending on the type of partnership your company has with PAY., you have different options. If you have entered into multiple partnership types with PAY., select the connection type. Choice of:
  • Business Partner
    (PAY. Commercial can follow up on the client, partner receives a kickback)
  • ISO Partner
    (Partner determines pricing, PAY. invoices, there is a revenue share)
  • Alliance Partner
    (Partner pays all costs and invoices the submerchant directly)
Yes
Package Select the package here. Depending on the type of partnership your company has with PAY., you have different options for the packages to choose for the Submerchant. Yes

Company details

Adding company detailsSubmerchant handmatig toevoegen2

Variable Value Obliged
Land Enter the country where the main organization is located. Yes
Chamber of Commerce number / business number The Chamber of Commerce number is unique and cannot be used more than once within PAY., except under Alliance Partners. Yes
Company name Enter the company name as registered with the local Chamber of Commerce Yes
Address + house number Enter the address and house number of the main branch Yes
Postal code/City Enter the company's postal code and city. Yes
VAT number The VAT number is used by PAY. for invoicing and potentially (for companies outside the Netherlands) to reverse charge VAT. For Alliance Submerchant, no invoicing relationship is established between PAY. and the Submerchant. The VAT number is therefore optional. no

Account details

Adding account details
Submerchant handmatig toevoegen3

Variable Value Obliged
Account holder Enter the name of the account holder to whom the funds are paid out here. This must be a business account in the name of the company. It is also possible to add this later. no
IBAN An IBAN starts with a country code. For example: NL12RABO1234567890. no
BIC Enter the bank's BIC code. no
Clearing frequency Select the payment frequency. Depending on the chosen package, the options are:
  • Daily
  • Weekly (every first working day of the week)
  • Monthly (every first working day of the month)
  • Manually - via API or an entry in the Admin Panel
Yes

Authorized signatories and UBOs

Adding authorized signatories and UBOsSubmerchant handmatig toevoegen4

Variable Value Obliged
Language Select the language of the user to be added. By default, this is set to NL. Choose from NL/EN/FR Yes
Gender Choice of man/woman Yes
First name Enter the full first name. Yes
Surname Enter the full surname. Yes
Email address Enter the user's email address. The person you add can log in with this. Yes
signing authority Indicate the extent to which this person is authorized to sign. Yes
UBO Check whether this person is a UBO. Yes
Rights Indicate whether this person is allowed to log in to PAY. Yes
plus sign / cross To add another person, click the green plus sign. If you have added too many people, they can be removed using the red cross. Yes

Contact details

Adding contact details
Submerchant handmatig toevoegen5

Enter the company's contact details below. A public email address and a public phone number are required. This information is also shared with payment options and with end users when they look up a payment via pay.nl/consument.

Variable Value Obliged
Contact method Choice of:
  • Email address
  • Customer service email address
  • Skype, WhatsApp or other communication medium
  • Phone number
  • Out-of-hours customer service line
  • Customer service line during office hours
  • URL - for example a contact form
Yes
Value Enter the email address, phone number, or URL. Yes
Description Describe where the entered number, email address, or URL leads, and how quickly it is responded to. All so that the end user has as little ambiguity as possible when looking up a payment. Yes
Audience Check this option if the contact details may be shared with third parties. Yes
Notifications For email addresses only. Check to receive payment notifications by email upon successful payment. Yes
plus sign / cross To add another person, click the green plus sign. If you have added too many people, they can be removed using the red cross. Yes

Sales location

Adding a sales location
Submerchant handmatig toevoegen6

Variable Value Obliged
Name Select the name of the sales location; this name will appear in your statistics and on specifications. In some cases, this name is also communicated to Payment Service Providers or End Users (Payers). Yes
Description Describe briefly and concisely what is being paid for. In some cases, this name is also communicated to Payment Service Providers or End Users (Payers). Yes
Category Select the category your offer falls into here; always choose the category that matches most closely. Yes
URL Provide the URL (if applicable) from which payments are initiated. Yes

Payment options

Selecting payment optionsSubmerchant handmatig toevoegen7

Because the availability of payment options depends on the selected category, the available payment options only become visible once you've added the sales location. Check the desired payment options that need to be activated. Some payment options (such as PayPal) require additional information. Don't have this information on hand (yet)? It's possible to activate or change payment options afterward.


Other settings

Submerchant handmatig toevoegen8

Offsetting against account balance - Within an Alliance Partnership, it's possible to deduct the cost invoice for your own services from the submerchant's account balance. To enable this and set this condition on the submerchant agreement, check the option "I want to use the merchant's account balance for my company's invoices." If you send the submerchant a separate invoice for your costs, you can leave this option unchecked.

Welcome email - After every registration, PAY. automatically sends an email to the created users with the login details. It's possible to change the email type or choose not to send an email at all.

  • No welcome email

  • Simple welcome email - Just the information that an account has been created for the user, along with the automatically generated password. Depending on the user's signing authority, the email may also contain a link to sign the agreement.

  • Extended email - Same as the simple email, with the addition of a brief explanation of the collaboration between the partner and PAY.

3. Adding a submerchant via API (action: partner)

Authentication

Basic Authentication
Authentication for the API Partner::addMerchant takes place via HTTP Basic Authentication

Request

In this request example, we add a merchant from a business partner account.

Request code: Adding a submerchant via API

curl --request POST
--url https://rest-api.pay.nl/v1/Partner/addMerchant/xml
--header 'authorization: Basic dG9rZW46PHlvdXItYXBpLXRva2VuPg=='

Parameters

Parameter Type Field Description
E-mail string OBLIGED Email address of the user to be registered
firstName string OBLIGED First name of the user to be registered
lastName string OBLIGED Surname of the user to be registered
companyName string OBLIGED Company name
cocNumber string OBLIGED Chamber of Commerce number of the company
gender string OBLIGED Gender of the user to be registered; options are 'male' or 'female'
street string OBLIGED Street name of the company
houseNumber string OBLIGED House number of the company
postal Code string OBLIGED Company postcode
City string OBLIGED Place where the company is located
countryCode string OPTIONAL Country where the company is established
bank Account Owner string OPTIONAL Name of business account holder
bankAccountNumber string OPTIONAL Business account number (IBAN)
bankAccountBIC string OPTIONAL BIC or SWIFT code
vatNumber string OPTIONAL VAT number
languageId integrity OPTIONAL Language preference for the user to be registered. Here you provide an ID. Available options can be retrieved via language::getAll
. Examples: 1 :NL, 2 :BE, 4 :EN. 5 :DE, 6 :FR, 8 :ES
authorizedToSign integrity OPTIONAL Indicates whether the user to be created has signing authority. Options are:
0 : NO
1 : YES, fully/independently authorized to sign
2 : YES, jointly authorized to sign
UBO integrity OPTIONAL Indicates whether the user to be created has UBO status. Available options are:
0 : NO
1 : YES
useCompanyAuth integrity OPTIONAL Indicates whether the user has rights as described here . Options are:
0 : NO
1 : YES
sendEmail integrity OPTIONAL Indicates whether the new user should receive a registration email.
0 : No email
1 : Standard registration email
2 : Short registration email
invoiceInterval integrity OPTIONAL Clearing frequency. Possible fields per day, week, or month (first Monday of the month).
signees array   Place where the company is located
array {
e-mail string required Email address of the additional user
first name string required First name of the additional user
last name string required Surname of the additional user
authorized_to_sign string required Indicates whether the additional user is authorized to sign. Available options:
0 : NO
1 : YES, fully/independently authorized to sign
2 : YES, jointly authorized to sign
ubo integrity required Indicates whether the additional user is a UBO. Available options:
0 : NO
1 : YES }
referralProfileId string OPTIONAL CP code that must be applied to configure the correct package
hasAccess bool OPTIONAL Access to merchant account. Available options:
0 : NO, use this option when you only want to register a UBO (and do not necessarily need access)
1 : YES, user has access to the merchant account
uboPercentage integrity OPTIONAL Indicates the UBO percentage in numbers only (for example, 25 for 25%)


4. How do I get access to the merchant account as a partner

A merchant can grant you, as a partner, access to the merchant account. To do this, they need to grant access permission once (the merchant can also revoke this at any time). To do this, your customer follows these simple steps.

5. How do I view my customer's account

Impersonating an account
mypay-sub-4

Successful impersonation
mypay-sub-5

Step Description
1 Go to the Manage tab and then Submerchants
2 Here you will find an overview of your submerchants. Click on the House icon to impersonate the desired account.
3 When you have been successfully impersonated, you will see "Imitation successful" and the name of the merchant account you are impersonating in the top right (next to your username).
4 To stop imitating, click the - (minus) sign in the top right, next to the Merchant name. You will then return to your own partner environment.

Getting an error message? Contact your partner manager or our Support department via 088 88 666 22 or email support@pay.nl.

6. Document status and uploading

Viewing file status
mypay-sub-6

Viewing file status and uploading documents
mypay-sub-7

Merchant > Company detailsmypay-sub-8

Overview of outstanding documents
mypay-sub-9

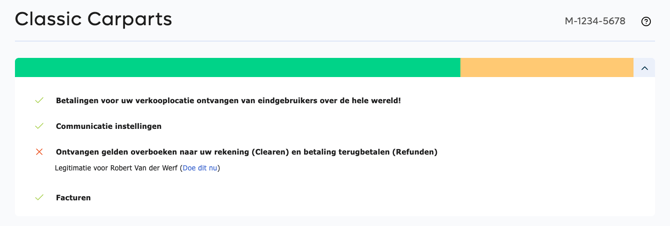
For successful boarding, it's important that the correct documents are provided. This applies to both the partner account and the submerchants. Think of a Chamber of Commerce (KVK) extract, UBO form, copy of identification, and a copy of a bank card/statement. You can easily support your customer with this via the partner portal.

Step Description
1 Go to the Manage tab and then Submerchants
2 Here you will find an overview of your sub-merchants. Click on the Eye to view your customer's file status.
3 If documents still need to be submitted, you will see a + next to the relevant document. You can use this button to upload the document for your client.

Alternatively, you can also impersonate your customer (if you've been granted these rights).

Step Description
1 Go to the Manage tab and then Submerchants
2 Here you will find an overview of your sub-merchants. Click on the House icon to mimic your customer.
3 You see an overview of all outstanding documents; you can upload these via the "Do this now" button.


7. Submerchant file status

File statuses and submitting to Pay.
StatusSubMerchantAccountsNL

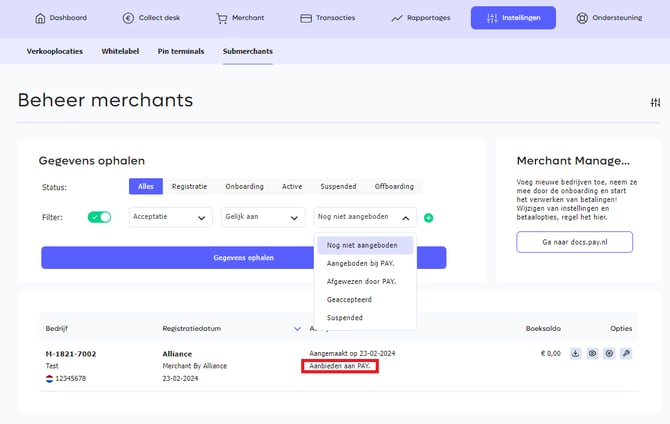
After all documents for your submerchant have been added, the account can have various statuses. You can view and filter by these via Settings -> Submerchants.

Status Description
Registration Submerchants that are still in the onboarding process and have not yet added everything will fall under Registration . Therefore, when creating a submerchant, it will start under Registration by default .
Onboarding As soon as the submerchant has provided all mandatory documentation, the account can be submitted to Pay. Image File statuses and Submit to Pay. The account is currently not yet active but is awaiting approval from a Pay. onboarding employee.
Active The account has been fully onboarded by Pay. and is now fully active. At this point, payout for the merchant is fully active and clearings can be sent.
Suspended Within this overview, you will find all submerchants that were once linked to your account but have currently closed their account and can no longer log in.
Offboarding  


8. Activating payment methods for your customer

Impersonate your customer's account (you can read how to do this here). Then you can activate payment methods just as a merchant would do themselves.

  • In the Admin Panel, go to the tab Manage » Sales locations https://admin.pay.nl/programs/programs.

  • Choose the sales location for which you want to set up payment options by clicking the 'change' link in the options column.

  • In the 'Payment options' section, select your desired payment options by checking the checkbox next to the payment option.

  • Click the orange 'change' button at the bottom of the page to save the changes.

See also the section Activating payment methods.

PAY. uses 250+ Payment Settings to indicate your preferences. These settings are used to pass information to internal systems (such as the VERIFY module, to the various payment options, or for configuring the payment screens). You can manage certain Payment Settings yourself; others can only be configured by your partner manager or another employee. The ability to adjust PAY.'s payment technology depends on several factors:

  • The package the submerchant has with us and the activated options.
  • The category of the sales location.
  • The type of integration (hosted solution, plugin, or other module)
  • Chosen payment option


9. Credits

When you enter into a partner agreement with PAY, we make certain (pricing) agreements. You don't need to do anything further for this — we make sure the rates are set correctly.

Business Partner

Usually a fixed kickback per transaction, depending on, for example, the level of the iDEAL rate. For credit card payments, you receive a percentage of the flow (volume). At the end of the month, we calculate your credits and pay these out via a clearing to the business account number provided in your partner account.

Alliance

Has a buy rate with PAY. and invoices the costs to their own customers themselves. In principle, you therefore only receive one invoice from PAY. at the end of the month for all transactions you've processed via the Alliance account. It's also possible to deduct your own costs from your customer's account balance. In that case, we carry out a clearing of the outstanding credits on your account balance.

ISO

Works with a minimum buy rate and revenue share. PAY. invoices your customers. We then calculate the revenue share, and the ISO invoices PAY.

The contract will be uploaded as an addendum to your partner account and can be viewed under the tab Company details, then scroll to the section 'Agreement'. Here you'll find an 'Addendum' with the description 'Partner agreement' (for example).

10. Payout history of credits

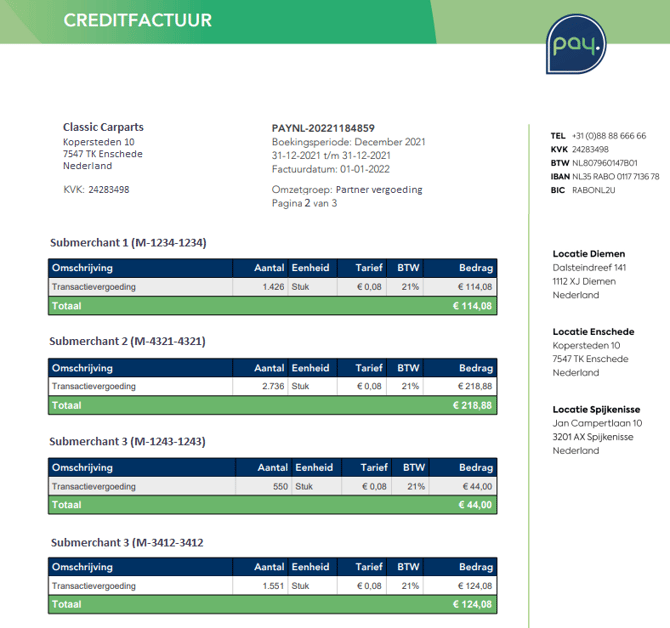
Credit invoice
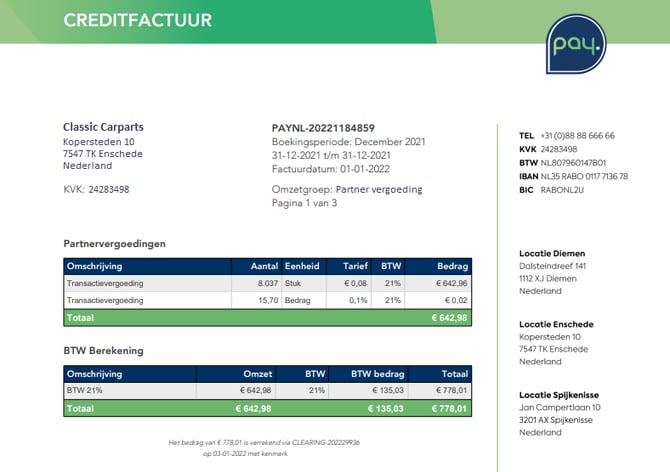
Credit_factuur_01

Overview per merchant
Credit_factuur_02

Under Merchant > Invoices (clearing) you'll find an overview of your clearings (payouts) and (credit) invoices.

  • Clearing history: this table shows all clearings that have already been paid out. You can not change the clearing frequency of partner credits. The configurable clearing frequencies only apply to standard (merchant) transactions.

  • Invoice history: this table shows all (credit) invoices. Here you'll find an overview of payouts per merchant (see screenshots alongside).