
What should I do when I receive a Wero dispute?
When a customer reports a problem with a payment made using Wero, a pre-dispute may be initiated. Wero is designed to give the customer and merchant the opportunity to resolve the issue directly before the dispute is potentially escalated.
If you receive an email from Wero about a dispute, follow the steps below.
In short
When you receive a Wero dispute:
- Check the email and identify the relevant transaction.
- Log in to the Wero Disputes Portal to view the dispute details and reason.
- Investigate the order and payment in your own systems.
- Contact the customer and try to reach a resolution together.
- Record your response and the resolution in Wero Works.
- Process any agreed refund or other resolution on time to prevent the dispute from being escalated.
Wero itself emphasizes that the pre-dispute procedure is intended to resolve issues directly between the consumer and merchant as early as possible.
Make sure you are familiar with the Wero Disputes and Chargebacks process.
In this article, we highlight Wero's own guidelines for pre-disputes. These guidelines are described here.
More information about each step can be found below.
Step 1 – Check the Wero dispute notification
You will receive an email from Wero when a dispute relating to a Wero transaction has been opened for you. The email initially contains the pre-dispute ID and a link to the relevant pre-dispute in the Wero Disputes Portal.
Step 2 – Log in to the Wero Disputes Portal
Next, log in to your Wero Works environment and go to Claims (Disputes).
Find the relevant dispute in the portal using the information from the email, such as the pre-dispute ID.
The Pay. order ID, which you can use to find the transaction in the Pay. portal, can be found under Order Details.
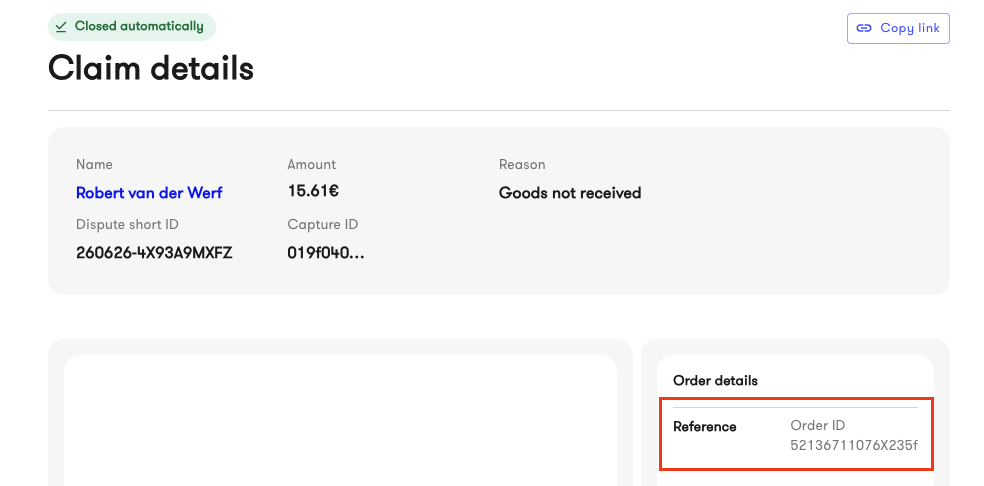
Then review all the information associated with the dispute. The Wero documentation explains that the pre-dispute procedure is intended to give the merchant and consumer an opportunity to exchange information and documents and work together towards a resolution.
Step 3 – Investigate the issue
Check your own systems to determine what happened with the relevant order and payment.
For example, check:
- Was the order actually placed?
- Was the payment received correctly?
- Were the goods or services delivered?
- When were they delivered?
- Is there proof of shipment or delivery?
- Does the delivered product match the order?
- Has there already been contact with the customer?
- Has a refund already been issued?
- Was the correct amount charged?
- Could this be a duplicate payment?
The reason for the dispute should guide your investigation. Wero describes various situations in which a consumer can report a payment-related problem, for example when an order was not received, when the purchase received does not match what was ordered, or when the wrong amount was charged.
The reason for the dispute is shown under Claim details: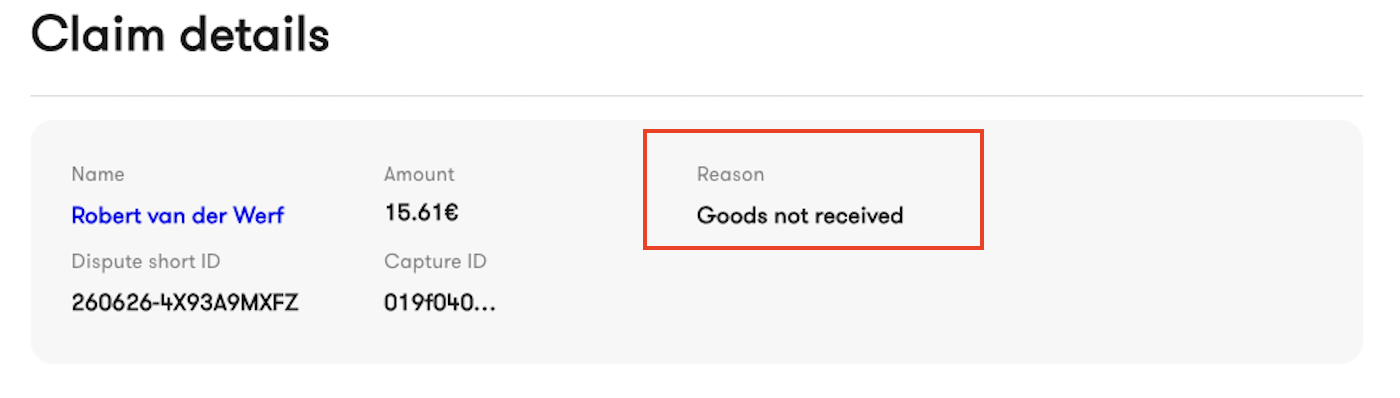
Step 4 – Try to resolve the issue with the customer
The most important part of the Wero pre-dispute process is that the merchant and customer first try to reach a resolution together.
Wero also advises consumers to contact the merchant first when they experience a problem. Wero indicates that issues are generally resolved more quickly when consumers and merchants communicate directly with each other.
Depending on the situation, you could, for example:
- offer a full refund;
- offer a partial refund;
- resend the order;
- deliver the missing product;
- propose an alternative solution;
- request additional information from the customer;
- explain why the payment or delivery was processed correctly.
The Wero dispute documentation explicitly mentions that a resolution can include a refund, resending goods, or an alternative solution.
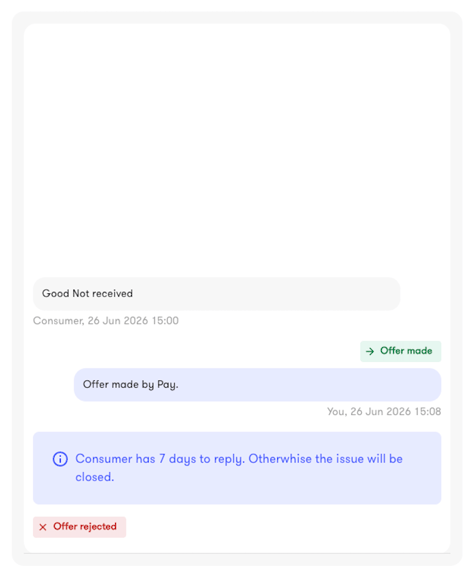
Communication with the customer takes place through the Disputes Portal. You can find the chat window within Claims, in the bottom-left corner of the screen:
Step 5 – Record the resolution in Wero Works
Once you have contacted the customer, record the outcome in Wero Works.
Depending on the situation, you can, for example:
Accept the dispute
If you agree with the customer's claim, accept the dispute and carry out the agreed resolution.
Resolve the dispute with a refund
If the resolution is a refund, make sure the refund is actually processed according to your PSP's refund process.
Offer another solution
For example, resend a product or provide another appropriate solution.
Respond with additional information
If you believe the claim is not valid, support your response with relevant information and/or documentation.
Wero describes the pre-dispute process as an opportunity for the merchant and consumer to exchange information and documents before the dispute is potentially escalated further.
Step 6 – Keep the deadlines in mind
It is important not to leave a Wero dispute unattended.
According to the current Wero Dispute Policy, the consumer and merchant have 30 days to reach an agreement during the pre-dispute process.
If the merchant accepts the claim, Wero requires the agreed resolution to be carried out within 7 days. This could include refunding the customer or carrying out another agreed resolution.
If no resolution is reached, the dispute can subsequently be escalated to the customer's payment service provider. Wero states that escalation may occur when the claim is rejected, when there is no response, or when the parties do not reach an agreement within the applicable timeframe.
Advice: Handle a Wero dispute as quickly as possible and do not wait until the deadline.
What happens if we cannot reach an agreement?
The pre-dispute process is intended to give the merchant and consumer the opportunity to resolve the issue together first.
If you cannot reach an agreement, the dispute may be escalated. It is therefore important to provide a complete response during the pre-dispute process and have all relevant supporting documents available.
What documents/information should I have available?
For each Wero dispute, make sure you can retrieve the relevant information about the transaction and order. Depending on the type of dispute, this may include:
- order confirmation
- invoice
- transaction details
- product or service information
- communication with the customer
- proof of shipment
- tracking information
- proof of delivery
- information about a previous refund
- proof that the correct quantity/product was delivered.
The official Wero documentation states that information such as transaction details, merchant information, basket items, shipping/billing details, and the reason for the dispute may form part of the dispute resolution process.
Only share information that is relevant to the dispute in question.